Birth of a Bangle
Are they cuffs or bangles? I tend to call them bangles, cos I like the word.
My carved skinny bangles were really popular last summer and I wanted to add some bigger, chunkier designs to my range.
They've taken a while to develop, so I thought I'd share a little of the process with you.
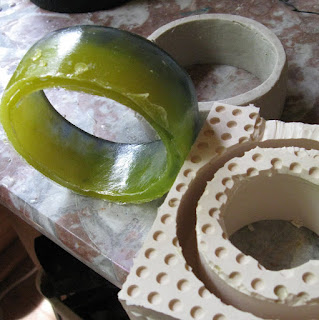
Back in April, having sketched out the shape and dimensions for my design, I made a mold from plastic - I used recycled plastic bottles - and poured a rough cast in modellers wax. Then I spent days filing and carving the wax til it was as smooth and comfortable as I could make it, leaving little trails of wax shavings wherever I had been.
 After nearly 3 weeks, I still didn't know if the bangle would look good. So I was a little nervous and excited when I un-molded the first full resin cast. I used a combination of indigo and pesto green pigments to colour the resin and once it had set (another 24 hours) and I had polished and finished the bangle. I don't think I've taken it off since.Now, after all that work, the fun really starts and I can play with techniques and colours using my own, handmade, original mold. You can see them all (except my green one, s'mine!) in my Etsy shop
My carved skinny bangles were really popular last summer and I wanted to add some bigger, chunkier designs to my range.
They've taken a while to develop, so I thought I'd share a little of the process with you.
Back in April, having sketched out the shape and dimensions for my design, I made a mold from plastic - I used recycled plastic bottles - and poured a rough cast in modellers wax. Then I spent days filing and carving the wax til it was as smooth and comfortable as I could make it, leaving little trails of wax shavings wherever I had been.
Raiding my boys Lego stash, I built a sturdy mold to hold this wax master. Lego is great because it's so quick and doesn't leak. This new cast is in silicone rubber. It's a little expensive but gives great detail to the cast and the mold can be used again and again. It needs to cure for a few days, if you can wait.
 After nearly 3 weeks, I still didn't know if the bangle would look good. So I was a little nervous and excited when I un-molded the first full resin cast. I used a combination of indigo and pesto green pigments to colour the resin and once it had set (another 24 hours) and I had polished and finished the bangle. I don't think I've taken it off since.


they are gorgeous, Su! and I love when you guide us through your amazing findings and processes. thank you for sharing! xo!
ReplyDeletefantastic work, su! i love the chunky bangles with all their character and big, bold color. interesting to see the mold and hear the back story.
ReplyDeletethanks!
very cool :) just posted this on our Artisans Gallery Team blog
ReplyDelete